Easy Layered Chocolate Walnut Bars: A Timeless Treat for Every Occasion
There are some desserts that transcend mere sweetness, becoming woven into the fabric of our most cherished memories. For many, these are chocolate walnut bars – a simple yet incredibly decadent confection that whispers tales of grandmothers' kitchens, holiday gatherings, and secret stashes. Imagine the delicate crunch of a buttery shortbread crust giving way to a rich, melt-in-your-mouth chocolate filling, all crowned with a delightful scattering of toasted walnuts. This isn't just a bar; it's an experience, a symphony of textures and flavors that brings comfort and joy with every bite.
What makes these layered chocolate walnut bars truly special, beyond their irresistible taste, is their remarkable versatility. They are surprisingly easy to prepare, yet present beautifully with their distinct, appealing layers. But the real magic lies in their make-ahead potential and freezer-friendly nature, making them an ideal choice for busy hosts, thoughtful gift-givers, or anyone who appreciates having a delicious treat on hand. Whether you lean towards the classic baked rendition or prefer a wholesome, no-bake alternative, these bars promise pure happiness in every form.
The Irresistible Appeal of Layered Chocolate Walnut Bars
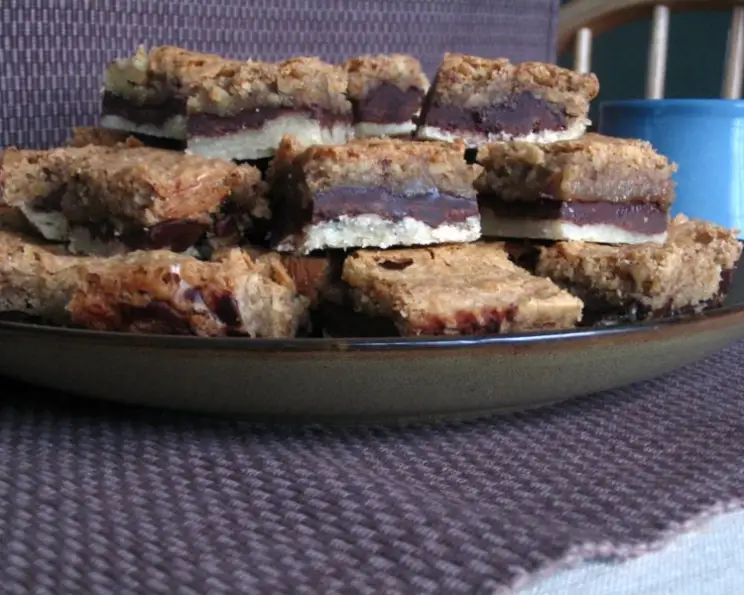
The allure of chocolate walnut bars isn't just in the sum of their parts; it's in the harmonious interplay of each distinct layer. The foundation is typically a tender, crumbly shortbread crust – a buttery canvas that provides the perfect contrast to the richness to come. Above this, a thick, glossy layer of chocolate often made with a blend of melted chocolate and sweetened condensed milk or other rich components, delivers an intense cocoa hit that satisfies even the most fervent chocolate cravings. Finally, a generous sprinkling of walnuts, often toasted to enhance their nutty aroma, adds a welcome crunch and earthy depth, balancing the sweetness and tying all the elements together. It’s a sensory explosion that is both elegant and comforting.
Beyond the taste, these bars hold a unique place in culinary tradition. They evoke a sense of home, often passed down through generations. The scent of them baking or even just being opened from an airtight tin can transport you back to simpler times, making them more than just a dessert, but a vessel for cherished memories and family warmth. Their ease of transport and ability to hold up well also make them perfect for potlucks, bake sales, or as a thoughtful homemade gift.
Crafting Your Own Easy Layered Chocolate Walnut Bars: The Classic Approach
While their appearance might suggest complexity, traditional chocolate walnut bars are remarkably straightforward to create. The process involves three simple steps, each building on the last to create a truly spectacular treat.
The Foundation: A Perfect Shortbread Crust
The journey begins with a classic shortbread crust. This typically involves just a few ingredients: butter, flour, sugar, and sometimes a pinch of salt. The key here is to use cold butter, cut into small pieces, and work it into the dry ingredients until the mixture resembles coarse crumbs. Some recipes call for pressing this crumbly mixture directly into your prepared baking pan (an 8 or 9-inch square pan is standard, often lined with parchment paper for easy removal), while others might suggest a brief pre-bake to ensure it's perfectly golden and sturdy. Pressing it firmly and evenly is crucial for a stable base that won't crumble excessively when cut.
The Heart: A Decadent Chocolate Layer
Once your crust is ready, it's time for the star: the chocolate. This layer is usually a rich concoction featuring melted chocolate (semi-sweet or milk chocolate chips are popular choices), often combined with sweetened condensed milk, a little butter, and sometimes a touch of vanilla extract. The mixture should be smooth and luscious. Once poured over the baked or unbaked crust, it creates that iconic, indulgent middle layer. The most important tip for this layer is patience: it needs ample time to set up completely after baking and cooling. Rushing this step can lead to a messy, unmanageable bar. Many bakers recommend making the bars the night before you plan to cut and serve them, or chilling them for at least 20-30 minutes after they've cooled to room temperature.
The Crown: Crunchy Walnut Topping
The final touch is the delightful walnut topping. While some recipes call for embedding the walnuts directly into the chocolate layer before baking, others suggest sprinkling them on top halfway through baking or even just after removing from the oven, allowing them to gently adhere as the chocolate cools. For an enhanced flavor and crunch, lightly toasting the walnuts beforehand is highly recommended. Spread them on a baking sheet and toast in a preheated oven for 5-7 minutes, or until fragrant. Don't be afraid to experiment with other nuts if walnuts aren't your favorite; pecans or almonds also make fantastic alternatives, offering a slightly different but equally delicious nutty profile.
Make-Ahead Magic and Freezer-Friendly Secrets
One of the most appealing aspects of chocolate walnut bars is their incredible make-ahead and storage potential. These bars are a dream for entertaining, allowing you to prepare a stunning dessert days, or even weeks, in advance, freeing up your time when it matters most.
Optimal Storage for Freshness
Once baked and completely cooled, these bars will keep beautifully for several days at room temperature, provided they are stored in an airtight container. This prevents them from drying out and keeps the chocolate layer from becoming sticky or picking up unwanted odors. For longer storage or warmer climates, the refrigerator is a good option, extending their freshness for up to a week. Just remember to let them come to room temperature for about 15-20 minutes before serving to ensure the chocolate is perfectly soft and enjoyable.
Freezing for Extended Enjoyment
Freezing is where these bars truly shine. They freeze exceptionally well, maintaining their texture and flavor for up to 3-4 months. For best results, ensure the bars are completely cooled before freezing. You can freeze them as a whole slab or, more practically, cut them into individual portions first. To freeze:
- Individual Portions: Place cut bars on a baking sheet lined with parchment paper and freeze until solid (about 1-2 hours). Once solid, wrap each bar tightly in plastic wrap, then place them in an airtight freezer-safe container or heavy-duty freezer bag. This prevents freezer burn and makes it easy to grab just one or two when a craving strikes.
- Whole Slab: If freezing the entire batch, wrap the cooled slab tightly in several layers of plastic wrap, followed by a layer of aluminum foil. Place it in a sturdy freezer bag or container.
Packaging for Travel and Gifting
Beyond home storage, these sturdy bars are also perfect for mailing to loved ones. For successful shipping, ensure the bars are well-cooled or even chilled. Wrap them in pairs, bottoms together, creating a stable block. Then, wrap these pairs tightly in plastic wrap, followed by a layer of foil. Pack them snugly into a sturdy, well-padded carton, filling any empty spaces with crumpled paper or packing peanuts to prevent shifting during transit. Place this carton inside a similarly sturdy outer box, ensuring it’s well-sealed. This careful packaging will ensure your delicious homemade gift arrives intact and just as delightful as intended.
Embracing Healthier Indulgence: No-Bake & Dietary-Friendly Chocolate Walnut Bars
While the classic baked version holds a special place, it's worth noting the growing popularity of chocolate walnut bars that cater to various dietary preferences, often with a healthier twist. These no-bake versions are not only incredibly easy but can also be dairy-free, vegan, and gluten-free, making them an anti-inflammatory dessert option that doesn't compromise on flavor or indulgence.
Simplicity in Ingredients and Process
The beauty of no-bake chocolate walnut bars lies in their minimal ingredients and straightforward preparation. The crust and topping often use the same base, which typically involves just four simple ingredients: walnuts (or other nuts like pecans or almonds), soft Medjool dates, melted coconut oil, and a pinch of salt. These are processed together in a food processor until a crumbly, sticky mixture forms. A portion of this mixture is pressed into the bottom of a parchment-lined pan for the crust, while the rest is reserved for the crumbly topping.
For the chocolate filling, a blend of melted coconut oil, pure maple syrup (or another liquid sweetener), and cacao powder (or unsweetened cocoa powder) creates a rich, decadent layer. The key here is to ensure all ingredients are at room temperature to facilitate easy mixing and a smooth consistency. A whisk can help achieve a perfectly silky chocolate filling. Once spread over the crust, the reserved crumble is sprinkled on top.
The magic happens during chilling. A few hours in the refrigerator (or even the freezer for quicker setting) allows the bars to firm up beautifully, creating layers that slice cleanly and hold their shape. These healthier bars can also be stored in the fridge for weeks or in the freezer for months, offering an equally convenient make-ahead option. If you're curious about a traditional, oven-baked experience, dive into our Classic Chocolate Walnut Bars: A Cherished Family Recipe. Or, for a truly guilt-free treat, explore No-Bake Vegan & Gluten-Free Anti-Inflammatory Bars.
Conclusion
Whether you're drawn to the nostalgic comfort of a classic baked recipe or the modern appeal of a healthier, no-bake alternative, chocolate walnut bars offer an unparalleled combination of ease, elegance, and sheer deliciousness. Their make-ahead and freezer-friendly nature makes them a perfect fit for any lifestyle, ensuring you always have a delightful treat ready to share or savor. So, roll up your sleeves, pick your favorite method, and create your own batch of these truly irresistible, layered delights. You're not just baking a dessert; you're crafting memories, one scrumptious bar at a time.
